 David Baker has been playing golf for nearly nine years but golf was never his primary sport. David’s first love was baseball, at which he excelled enough to play in college. Now, for the first time, he is devoting himself to golf setting goals of playing competitively in tournaments and eventually winning his club championships. It will take a lot of hard work but I think we can send him in the right direction.
For an eight handicap, David has built himself a swing that I would describe as overcomplicated. Lots of players can survive with a swing like this but if you are truly looking to lower your handicap quickly, you need to give yourself a solid set up first.
Read on to see David’s swing and the fixes I’ve outlined for him.
The Swing
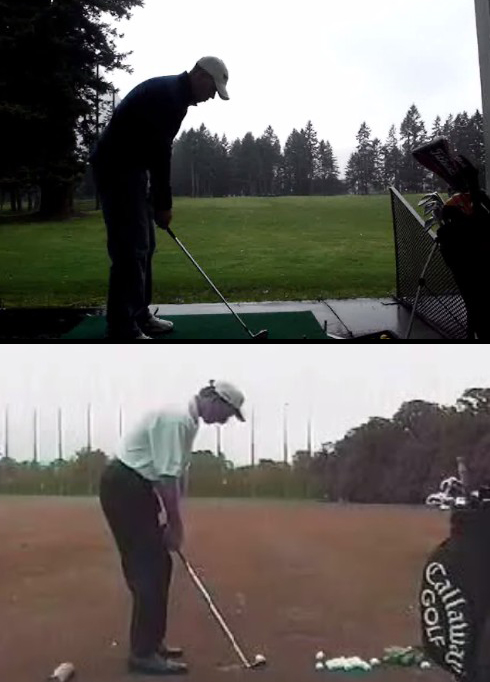
Simon’s swing can be seen here as a Windows Media file. This shows the down-the-line angle with his 6-iron. I would highly recommend that you watch the video, identify what you have believe is his root problem, and then read on.
Swing Plane
I would like to really jump into this article but I feel a bit of review is necessary first. Let’s quickly review what lines to draw when you are analyzing swing plane.
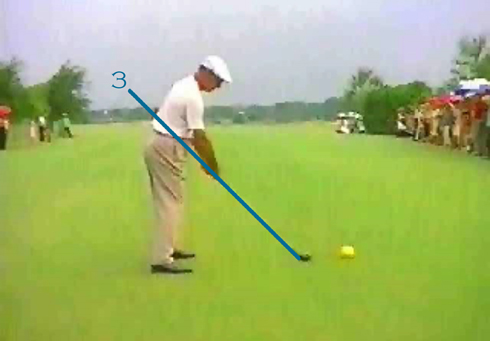
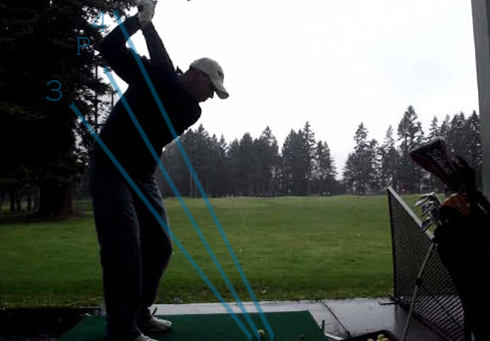
Line 3: Line 3 runs from the hosel of the club through the butt of the grip and continues up approximately two to three feet past your body. This line represents the absolute lowest that your club should ever go.
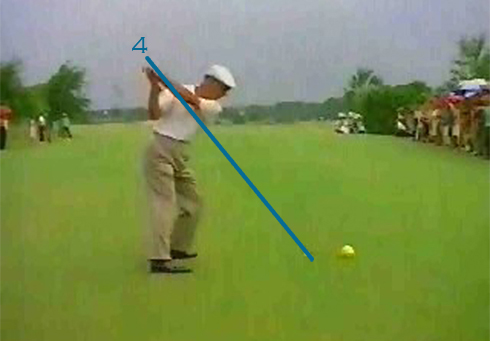
Line 4: Line 4 runs from the toe of your clubhead through your trailing shoulder. This represents the highest your hands, shaft and clubhead should go. If your leading hand is lower than this line, redraw the line so that it is touching the top of your hand. Remember, your hands, shaft, and clubhead should never cross this line during any point in your backswing or downswing.
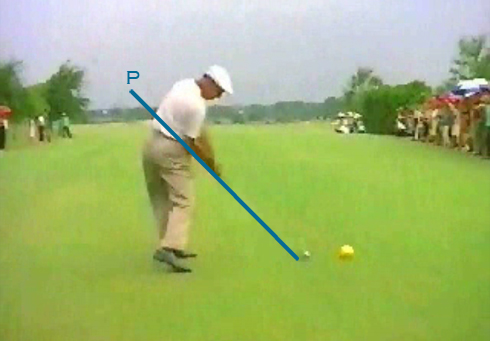
Line P: Line P is slightly more difficult to draw. This line is not drawn at the initial set up but should only be drawn at impact. To draw this line you will need to freeze the frame at impact and then draw a line running from the hosel of the golf club, through the butt of the grip, and continue approximately two to three feet outside of your body. With the proper swing plane you will come down this line and start your follow through on this line – which is being on plane.
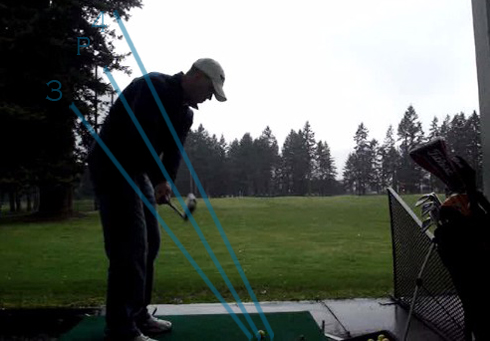
Let’s take a few frames of David’s swing and see how he is doing with those lines drawn.
Take Away
Top of Swing
Down Swing
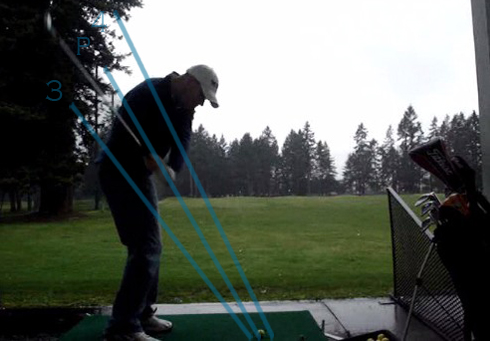
While David’s take away is within an acceptable range, everything after that point becomes very complicated. For instance, if you look at David’s swing you can see that he is low by about 15 degrees. For most players that are that low, it is virtually impossible to hit the ball straight so they are forced to rely on shaping the ball – usually with a draw. If you look at the top of his swing, you can see that he is crossing Line 4 with both his arm and his shaft. Combined, we have an incredibly complicated movement that will prevent him from really truly excelling. Unfortunately, while I believe that these are problems that we will have to address, it is not his most pressing problem.
Down the Line Set Up
I would say this for people that want to be pros as well as those who are just starting the game, there is nothing more important than perfecting your set up. Ultimately, your set up is what will allow you to make certain motions and maximize the torque your body produces. Yes, lots of pros get away with some pretty funky set ups but they are clearly in the minority. Before addressing David (no pun intended), let’s go over a few of the key attributes of a solid down the line set up.
Posture
Your posture at set up has two goals: 1) to put yourself into the best position possible to remain balanced and 2) to allow your muscles to work most efficiently. The first, and most important part of this position is that your spine is straight or nearly straight. If your back is not straight, you are putting an enormous amount of stress on your back. After your back is straight, your next step is to find the perfect angles for your legs and spine. This can be difficult considering we all come in lots of different shapes and sizes but a few numbers keep popping up amongst the PGA Tour’s best. Take Tiger for example.
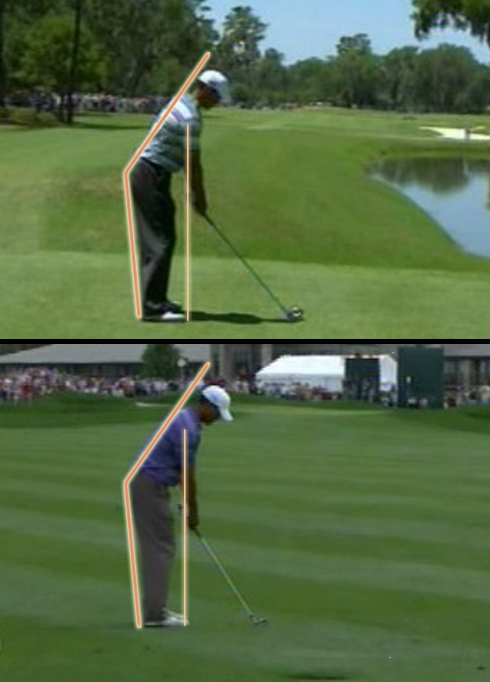
With his driver, Tiger is leaning towards the ball approximately 35° with his upper body and is leaning away from the ball by approximately 8° with his lower body. With his wedge, Tiger is leaning towards the ball approximately 39° degrees with his upper body and is leaning away from the ball by approximately 8° with his lower body. While Tiger is just one example, these numbers appear for Hogan, Duval, (1999 version), as well as lots of other players. This does not mean that these numbers are perfect for you but they are a great starting point.
Arms
While this is a slight oversimplification, the butt of the club should be just outside of your shoulders with every club in your bag. This position will ensure your posture does not have to change much during your swing as well as allow you to utilize your core muscles.
David’s Set Up
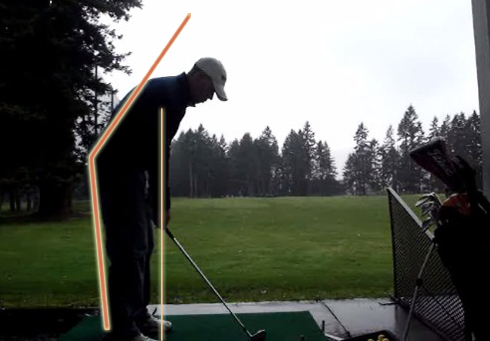
If you look closely at David’s set up two things should jump out at you immediately: 1) his spine is bent and 2) his arms are too close to his body. Both of these are enormous problems but our real question is where he needs to go.
Clearly if David is in this position with his 6-iron he is likely in this position with the rest of his clubs. He likely looks like a slightly more bent over Jim Fuyrk:
Potential Fixes
Here are a few suggestions for how I would approach achieving a proper down the line set up.
Start with Your Legs
If legs in the golf swing are relatively constant across players, then it seems this is a good starting point regardless of whether you are a beginner or not. In order to achieve the proper angle, you are not trying to lean back but you are creating a greater angle by bending your knees. The more you sit down and get closer to the ground, the greater of an angle you are creating. Put yourself into a balanced position – one where you feel someone could push you and you would not fall over – and see what kind of angle you are creating. If you can’t measure the angle try simulating the impact position while leaning your legs as much as you can away from the golf ball with your butt barely touching a wall. If you are not pressing into the wall with your leading hip at impact, you likely did not create enough of an angle. Bend your knees a little more and then try again.
Then Your Upper Body
This is extremely tricky considering the variance in everyone’s height and weight. I would highly recommend starting with 35° with all of your clubs and then adjust from there. More important than anything though; your back should absolutely, positively not be slouched over at set up. Your spine should appear straight as a rod at set up. If it is not you are setting yourself up for a major back injury. This may feel uncomfortable at first but you should make the adjustments now before a doctor has to make them later.
Then Position Your Arms
Without a ball at first, I would practice positioning the butt of the club slightly outside of my shoulders pointing between anywhere from my belly button to belt buckle. Positioned correctly, your leading arm should be pretty close to straight. After this, I would make sure that the bones of my leading hand and my leading forearm form a nearly straight line. This slight adjust will likely straighten your leading arm even more putting you in a very strong stable position.
Then Position the Ball
Once you have this positioning down, add a golf ball. I would recommend this order because it is hard to resist setting up to the golf ball and then fiddling around with our set up again. I would work on making this comfortable first and then check yourself when you set up to the golf ball. In the long run, you do not want to take golf swings that are inherently flawed at the set up. Practice getting this right first.
Time Line: Even though this change could be instantaneous, anything that involves your back can take quite a while to get used to. I went through this change three separate times and each time took me about a week before I didn’t feel like the position was forced.
Be sure to monitor… your spine angle during your swing. Changing your spine angle at set up does not guarantee that you will make the change during your swing. Lots of players, even tour players, struggle with dipping or allowing their back to sag as they approach impact. Monitor this closely to give yourself the best chance moving forward.
Conclusion
I would love to address the top of David’s swing but I did not feel that we could move forward until he changes his posture. Scoring low requires not only a swing that you can depend on but a body that can last throughout the round. Take my word for it, back injuries are not fun. Hopefully he can make this change quickly so we can move him closer to that club championship.
Your Turn!
If you’re interested in having your swing analyzed in a future edition of Swing Check here on The Sand Trap, check out the requirements page and submit your videos today!
Ahh…very nice. Inconsistnacies with my set-up and posture is one of my major problems. I have a tendacy to dip and sag with my posture as well. I usually hook when this happens. Perfecting the set up is the easiest way to improving your ballstriking without a swing overhaul.
35 degrees bend is a number im not familar with. Im a feel player, so if i cant feel it or calibrate it optically while i stand at address, i wont do it. Whats a good method to feel 35 degrees? ( reletivley)
That’s a good question. A lot of people feel this differently but I would definitely start by trying to feel your spine as straight. If you need to ask a friend to take a golf club and place it on your back during your set up. Try to make it so that your tailbone and your head are both touching the shaft.
From there, it is just a matter of the type of golfer unfortunately. How much weight you have in your upper and lower body is going to have a huge impact on what that feels like. I, for one, needed to stand a little taller so I consciously had to feel like I was pulling my head away from the ball when I was setting up. What I would recommend doing if you have a video camera, is simply drawing that 35 degree line on a piece of transparency and then put it up to the screen of your camera when you are at the range. Feels can lie, those lines won’t.
Hi,
I have question about 3,4, P… When you draw those lines What to observe with P ? P is like elbow plane ? And what are standard deviations from that line ?
regards,
Marjan
Please see above. Line P is not drawn through your elbow but is drawn through the shaft at impact. Some players, like Tiger or Hogan, have Line P drawn much lower than their elbow while others are even higher than their elbow. Don’t focus on where the line is going through so long as you are coming down the line your shaft is on at impact. Hope that helps.
Yes that part I understand (how to draw the line) but what to watch/observe after that … when i compare my swing (wannabe:-) one plane) I see my right elbow from shaft parallel to the ground to the impact … that goes in that (plane) line.
Cheers,
Marjan
I checked your homepage and Find all answers ! And I checked my camera angles (a bit off) and my swing plane is a bit off !
This article was absolutely awesome!
It was very helpful and definitely one of the most helpful articles i’ve read so far on the sandtrap. Nice work O’Connell
David,
Many thanks for the great article. The only question I have is (concerning) ball position – doesn’t the position of the ball change as you hit different iron shots?
There is a big debate about ball position. The way I learned, and the way which I believe is easiest, is to play the ball off of the instep of your leading heel, left for right handed golfers, and then narrow your stance with your right foot. I’ll do an article on that in the near future to clear that up a bit.
TMO