
 You can build your own outdoor putting green or you can have one built for you if you’ve got $5000 (or more) to spare. You can buy a typical roll-out indoor putting “carpet” for $20-$50. You can’t build your own 8′ x 8′ indoor putting green for less than $250. Or can you?
I live in Pennsylvania, making “winter golf” a matter of either visiting the nearby golf dome or playing Tiger Woods PGA Tour on my GameCube. Eager to maintain my putting stroke during the snowy months, I sought to build an indoor putting green that would adjust to provide adjustable break and putts up to about 10 feet in length. Perhaps it could even allow some gentle chipping from a nearby mat.
The journey – and the project – is documented here.
Concept to Blueprint
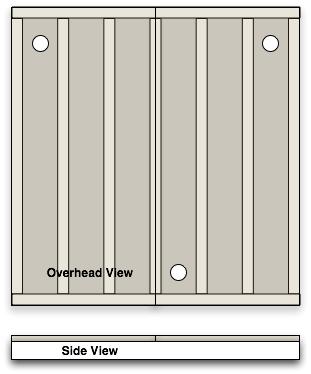
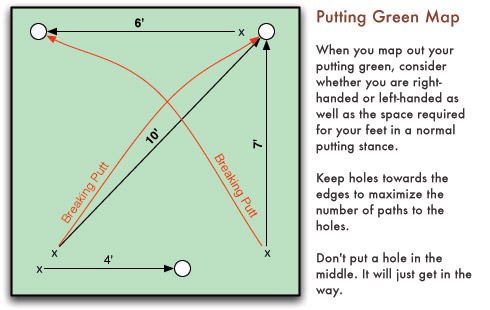
My first idea called for a 10′ x 10′ putting platform. The kind fellow at Home Depot quickly informed me that such an idea was stupid, given that boards come in eight-foot lengths and that plywood measures 4′ x 8′. The plan was revised: an 8′ x 8′ platform. I drew up some rough blueprints (right, below) and counted up the materials: 9 boards, two sheets of plywood, some nails and screws, some glue, some cups, and a piece of green carpet.
 Eager to keep the project on budget, I purchased what I could at Home Depot – everything but the cups and the carpet. For the putting surface and cups, I found only one reasonable place from which to get everything: Wittek Golf. The most expensive part of the entire project was the putting green surface. We chose the One-Putt Carpeting, which ranges in price from $9.25 to $10.50 per square yard and comes in a 12′ width. Other putting surface manufacturers charge as much as $4.99 per square foot, but the tradeoff is clear: this putting turf has no cushioning or subsurface and is not designed to handle approach shots or outdoor conditions like the more expensive variants.
You need some cups, too and for $4.25 apiece, you can buy your Practice Green Cups from Wittek as well. If you want to add a finishing touch, consider the Flag Sticks (and flags) available for $11.50.
Tools and Materials
I already had some tools available, and I’m going to assume you’ve got a similar toolset (or can borrow them):
- circular saw (to trim 2x8s)
- power drill (with various drill bits)
- screwdriver (or screwdriver bits)
- carpet knife
- sandpaper
- hammer (you can’t touch this)
- level
- tape measure
- t-square or 90° ruler
- trowel
Here’s a list of the materials you’ll probably need to purchase:
Material Qty Cost Total
------------------------------------ --- ---- ------
2" x 8" x 8' pine boards 9 5.29 47.61
4' x 8' x 5/8" particle board 2 12.99 25.98
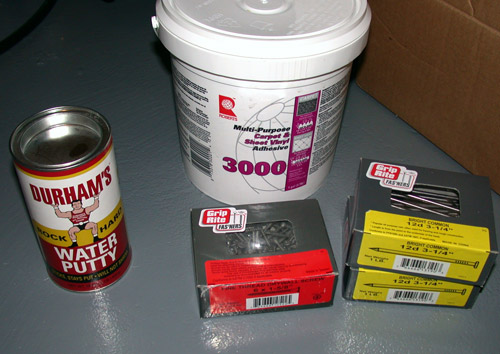
Water Putty (smoothing paste) 1 3.99 3.99
3-1/4" drywall nails (1 lb box) 1 3.99 3.99
Carpet/sheet vinyl adhesive (bucket) 1 7.99 7.99
6 x 1-5/8" drywall screws (200/box) 1 5.99 5.99
4-1/8" hole saw blade 1 6.99 6.99
Practice putting green cup 3 4.25 12.75
One-Putt putting green surface 12 9.25 119.40
------------------------------------ --- ---- ------
$234.69
We chose 2x8s because they cost little more than a 2×6 and offered substantially more resistance to bending or bowing. Plus, cup height would have been an issue on a 2×6 and 2x4s are far too flexible to support a person’s weight without significant bowing. You may elect to use plywood over particle board, but drilling the holes for the cups may prove to be much more difficult.
Hit Home Depot or Lowe’s for the wood, screws, nails, glue, and other materials. We recommend building your putting green in the same area as it will be located when finished. The final product will weight a few hundred pounds and measure 8′ x 8′, after all.
Step 1: Lay out the Frame
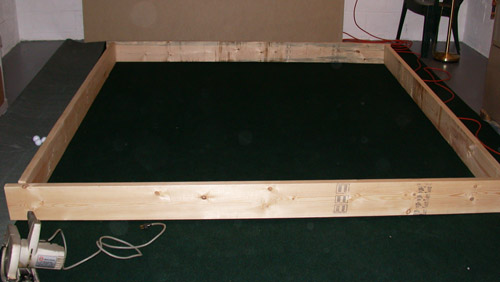
To get a general sense of the project, lay out your putting green’s frame. Choose four side boards that are moderately warp- and twist-free. Boards with one nice-looking side are a bonus. Arrange the boards so that the pretty side faces out in a rough square.
Step 2: Cut the Cross-Beams
2x8s are eight feet long and the putting green is going to be 8′ x 8′. If you nail the boards together without cutting anything, the putting green will be 8’3″ x 8′ – the extra three inches comes from the two end boards. 8’3″ is too large an area for the particle board. We have to trim three inches – the thickness of two end boards – from all of the cross boards.
Cut seven of the 2x8s to 7’9″. Bear in mind the carpenter’s saying: “measure twice, cut once.” These seven boards include the two that will form opposite sides of the green. Though you could trim 1½” from each end of your eight-foot boards, we recommend simply taking 3″ from one end. Opt for the side with splits or knots, if possible.
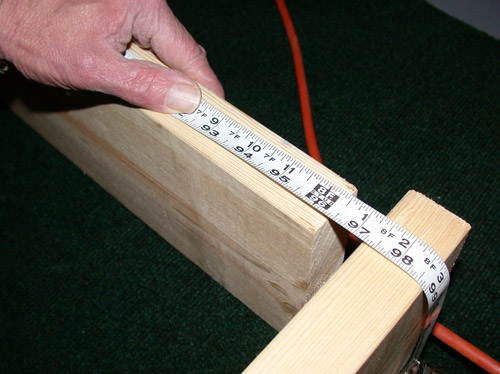
While you’re cutting boards, make sure the two end pieces you aren’t going to cut measure eight feet in length. If they’re a tad larger, trim them to size. If they’re a tad smaller, re-evaluate which pieces you’re going to use as ends.
Step 3: Install the Cross-Beams
Once the cross-beams have been cut to size, nail the outer boards together to form a square. I recommend drilling pilot holes before nailing the boards together. Pay particular attention to line up the top edges of the boards.
The pilot holes, the nail, and the even tops are visible in these photos:
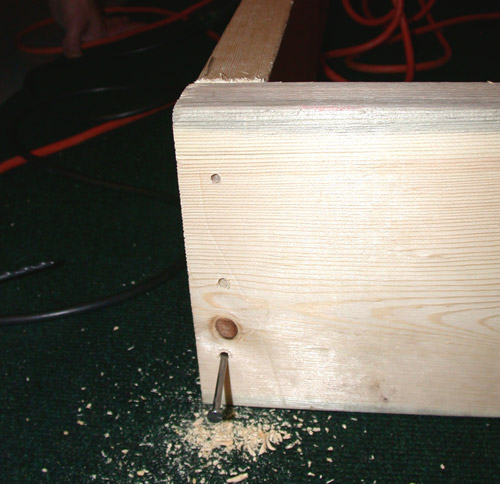
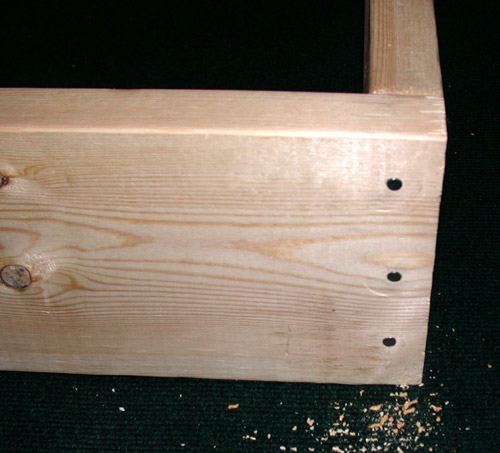
Once you’ve nailed the outer frame together, use the 90° ruler or t-square to make the boards as square as possible. It’s quite possible to work with a rhombus, but it makes things just a tad more difficult. <grin>
After your frame is squared up, install the next most important cross-beam: the middle one. If you look at the blueprints at the top of this article, you’ll see that this cross-beam will support both pieces of particle board/plywood. It needs to be carefully centered.
Measure in four feet from both ends of the two uncut end boards. If your board is eight feet in length, you should identify the same spot. Draw a vertical line with a pencil on both end boards at the spot you’ve identified as the middle. You may wish to lay a piece of particle board or plywood down to make sure you’ve measured properly. Measure twice, drill once. Once you’re certain the measurement is accurate, drill three pilot holes and nail the cross-beam in place. Triple-check by laying your particle board on top and looking for the important overlap.
At this point, you have four cross-beams remaining. Two will fit between the middle cross-beam and each side. On each side board, measure 15½” in both directions from the middle line you previously drew and draw more lines. Nail the crossbeams in place.
For the cross-beams nearest to the side boards, measure 16″ from the end and draw lines again. Nail these cross-beams in place. This will evenly space (within ½”) the cross-beams to provide for maximum support.
Step 4: Secure Particle Boards
Once the frame and cross-beams have been drilled and nailed, it’s time secure the particle boards to the frame. Lay the particle boards down on top of your frame and once again make sure that things are square and that the edges of the particle board come to the edge of your frame. You may need to adjust the frame to square it up just a bit more (kicking works; just make sure you’re wearing shoes!).
Use drywall screws and a power drill with a screwdriver bit to screw down the corners of the particle boards. Drill about ¾” from each side (the middle of a 1½”-thick board). Don’t worry about countersinking or measuring – the screws should flatten themeslves out and you should be able to approximate the middle of a board.
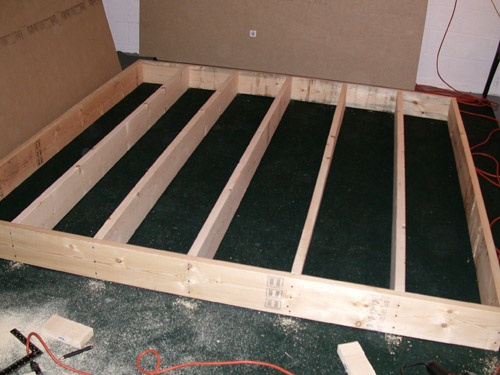
Once the corners are secured, it’s safe to walk on the platform. Make sure that everything fits snugly and that the center of the platform does not sag. If it does sag, your center beam is not positioned under both edges. Ooops! Also make sure that boards don’t clack against each other. That implies that boards aren’t positioned to properly suppport the particle board.

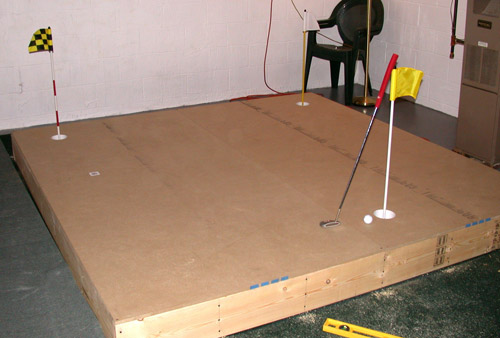
It’s appropriate at this time to figure out where you want to put the holes. I’ve roughly marked the positions of the holes with waste pieces of wood in the picture below. I think this pattern provides the most variety of putts for a right-handed putter:
Take care to make sure that the intended holes are not over a cross-beam. Mark the centers of your holes. Keep the centers at least three inches from any cross-beams and sides. The radius of a standard cup is 2-1/8″, and a little bit of “slop” ensures that you won’t encounter problems down the line.
Secure the particle boards by putting screws every 12 to 16 inches along the edges. Draw lines on the particle board to mark the centers of the cross-beams – the nails on the ends provided all the information necessary – and screw the particle board to the cross-beams as well.
Step 5: Drill Holes
This is a tricky step, so pay attention. Secure the 4-1/8″ hole saw blade to your drill. As you can see below, I’ve rigged the hole saw with a guide screw and drilled a small hole at the center mark in the particle board. The hole and guide screw will ensure that the blade stays in one place, and is particularly handy when you’re just starting the drilling.
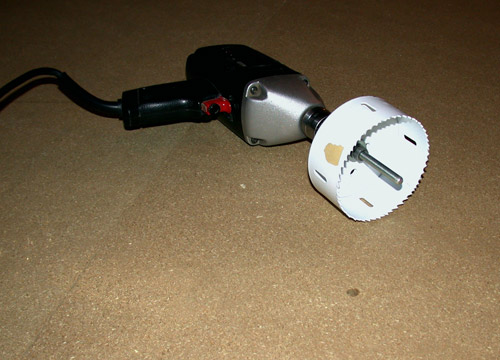
Particle board is a little easier to grind through than wood, and I found it easier to run the drill in reverse to cut the holes. I spent about two minutes drilling each hole, slowly grinding the hole away with what amounted to the backs of the hole saw teeth. With the guide screw, I never worried about drilling an oval or a hole larger than intended – the hole saw stayed centered. Take your time and cut a good, clean hole.
Step 6: Install Holes
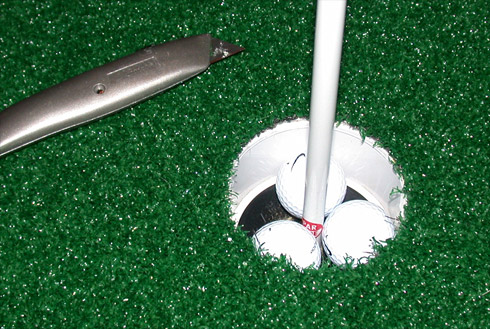
When you’ve finished drilling your holes, the putting cups will probably not fit. The hole you drilled (4-1/8″) measures slightly smaller than the putting cup (4-1/4″). With sandpaper, take away some of the particle board around the inside of the hole until the cups barely fit. I used sandpaper attached to a drill bit ($4.99 at Home Depot) to sand away the inside of the hole.
Once your hole is barely large enough to accommodate a cup, put the cup in the hole. If you’ve sized it properly, it will require a tremendous amount of force to shove the cup down into the hole. Put a board over the cup and gently hammer it down until it’s flush with the surface of the board. This minimizes the force the plastic cup receives and you won’t have to worry about breaking the cup.
When you’re done, and if you ordered flags, put a flag in the cup and check to make sure that the cup is level.
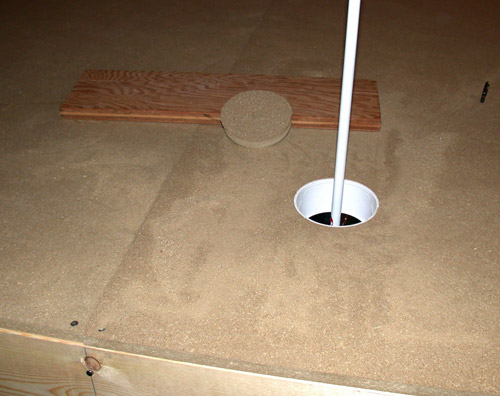
Repeat the process for all three cups. You should have something that looks like this:
Step 7: Glue Down Green
Putting green carpets (turf) are available in 12′ or 15′ widths, so we ordered a 9′ x 12′ piece of carpet. This will provide a little slop in one direction and a good amount of slop in the other. The measurements: 3 yards by 4 yards, or 12 square yards. At about $10/square yard, this is the priciest piece of the project. You could get cheaper carpets from Home Depot or Lowes, but the indoor/outdoor carpets we tested stimped at about 16 – far too fast for a practice green.
Lay out your putting turf and put encyclopedias or moderately heavy books on any bumps to help flatten the surface. Let it sit for a few days until the ridges or bumps from shipping have been smoothed. If you start with a flat piece surface, it’s easier to end up with a flat surface.
Lay your flattened turf on the platform to make sure that it’s flat and that it fits. Avoid stepping on the holes and putt on the carpet to confirm that it’s relatively flat. Any bumps that remain after the encyclopedia treatment can be glued down fairly easily.
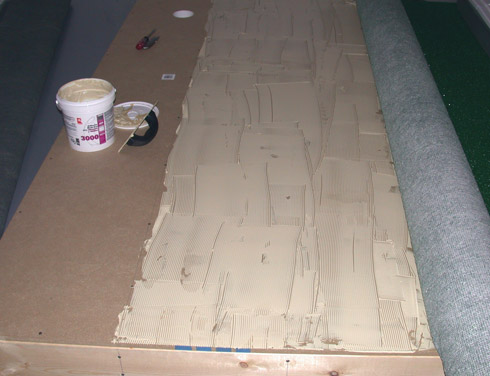
With the turf laying on the platform, roll back a foot or two along one side. Sweep the particle board to clear it of dust. Spread carpet glue evenly on the exposed particle board, then roll the carpet back over. Walk on each inch of the glued-down carpet, then rest the encyclopedias on the surface to ensure that it remains flat while the glue dries. Pay particular attention to what you lay on the carpet. Don’t choose anything that can leave impressions (like a Tupperware container, which does not have a flat bottom) or you may find that you’ll crush parts of the carpet unevenly.
When the glue has dried, roll up the carpet from the opposite side and spread glue over the next foot or two. Roll the carpet down over the glued area and pull it snug. Walk on each inch and move the books to the newly glued area. Repeat this process until the entire carpet has been glued down, foot by foot. I used the cross-beam lines and screws (spaced every 16″) as my guide.
Step 8: Trim the Carpet and Cut out the Holes
Take a carpet knife and cut along the edges of the platform to remove the extra carpet. You may find it easier to cut the bottom of the carpet instead of cutting through the “grass” on top. If you’ve glued right to the edge, this step is pretty easy. Angle the blade slightly inward – towards the wood – to help you cut in a straight line.
If you’ve marked the locations of your holes – or have a good idea where they are – locating them will be easy. Take a pin or a small nail and push it through the turf near to where you suspect the holes to be. If you strike particle board, well, your hole ain’t there.
Carefully cut your holes out with the carpet knife, being particularly careful not to lift up on the carpet surrounding the edge of the cup. (Should you do so, carefully re-apply some glue.) I cut the lines across the center of the circle, like you’d cut a pie, and then cut out each “piece” of the pie. Cut a smooth circle, using the plastic of the cup as your guide. The turf is glued down, so take your time.
You may have some straggling strands of grass hanging over the lip of your cup (as seen above). Slice them off as well if they disturb you.
Step 9: The Bumper Rail
 The final step: installing a bumper rail around the outside. The bumper rail will prevent the ball from falling off the edge if you putt past the holes. Bumper rails should be low enough that you can putt from near the edge without smacking the rail on your backstroke.
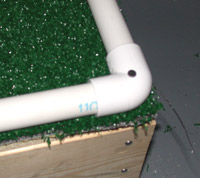
I chose ¾” PVC pipe. 10-foot lengths cost $1.09 at Home Depot and 90° elbows cost $0.19 each for a total cost of about $5. You may wish to install wooden borders (quarter-rounds work well), a small fence, or to otherwise decorate the perimeter of your putting green.
If you go the PVC pipe route, cut the pipes to length (a little under eight feet) with a hacksaw. Fit the pipes into the elbows and lay the assembled bumper rail on the putting green to make sure that it’s properly sized and square. Drill a pilot hole through the elbows and nail them to 2x8s. I also chose to nail the middle of each pipe as it had a tendency to bow upwards just a bit.
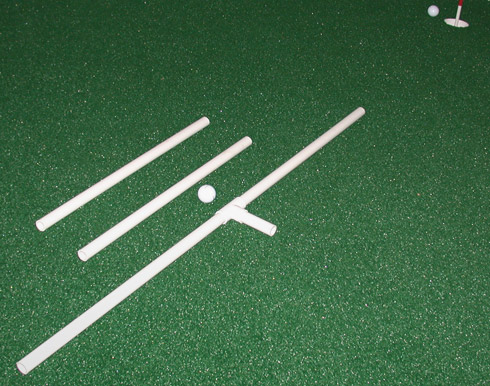
The nice thing about the PVC pipe approach is that the two-foot scrap pieces can be used to create alignment aids. Here I’ve stuck two long pieces and one shorter piece in a t-bar and used two other longer pieces to create a putting track and a foot alignment aid.
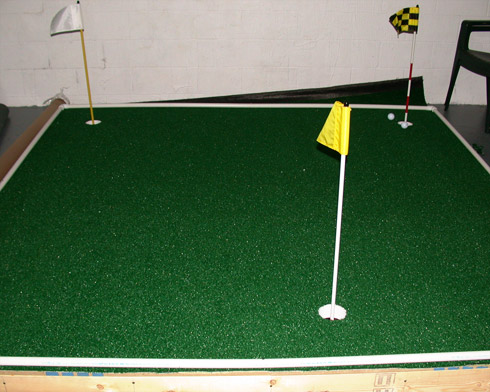
Step 10: C’est Finis!
That’s it! You’re done! Congratulations! Putt away, my friends, and enjoy!
Customizations
There are any number of customizations you can add to your putting green. Here are just a few:
- Add a method – whether it’s as basic as stacking bricks under one side or as complex as using a jack – to raise and lower at least one side of the green. This allows you to alter the break of your green.
- Decorate the sides of your putting green with artwork, paint, stain, or something creative. If you like bling bling, chrome it!
- Put nails or eye-hooks in certain places, then attach string. You’ve got a built-in way of providing a visual clue for the line. See our previous tip for more on this.
- Drill a few holes, put some nails through spare blocks of wood, and you can create a little bumper golf course that can be removed easily.
Get creative! See what you can come up with, and post your ideas in our comments (below). That’s all we’ve got time for now, but we hope you enjoy your putting green as much as we have enjoyed building and using ours.
Thanks for the amazing walk-through of your project. I thought a player of your caliber would have more than a Nike ball in your putting cup.
🙂
Elegant practice green, Erik! For those of us with perhaps less room the right half of your green (as shown in the first illustration) would make a very nice 4×8 green. At that size one could pretty easily stand it up on edge to take up less space when not in use. You could also put a couple of wheels on one end to roll it outside and have a little fun during weekend barbecues.
Regards,
Raymond
Chris, Nike balls aren’t too bad. But they’re downstairs in the basement – and not in my bag – for a reason. 🙂
Nice work. A friend did the same thing but had Home Depot cut the 2×8 cross beams to 2x7s so there is a lip around it to stop the balls. He also dug a 8×8 square ditch 4 inches deep to put it in.
Nice design. How exactly did you make the break? I didn’t see those instructions, though I could have missed them.
I introduce break by putting wood blocks under one side, slanting the entire platform. The KISS approach.
Great info Thanks! Just wanted to know what speeds are available? I have a private club and they have really fast greens…..
Lots of speeds are available. Frankly, though, practicing a good firm stroke is good even on fast greens. My country club is regularly 11 or 12, and the green putts at about 10, and I find that it’s good practice.
Oh man your a genius. I tried it out and it totally sucked. Thanks for nothing.
“Your” welcome, Bob. It worked and continues to work for everyone else.
It’s very ironic I ran across your design. I thought of this exact idea months ago and wondered if it would work. I would want a larger one than yours and would want to put it in the ground to chip onto. My only concerns are 1)creating break 2)creating a more cusioned surface to allow pitch shots Any ideas???
For that kind of stuff, Jimmy, you’re really going to have to get one of those greensmakers to install a synthetic putting green for you. Add $200 to the cost and then add a zero to the end for a small-ish green.
Great instructions for an indoor green, but what are your thoughts on a similarly cheap outdoor green? Would the same type of turf work outdoor with a little more ground preparation? My main concern and cost is the turf, since I would like to do a large area in my backyard for chipping and putting without paying the thousands of dollars to do.
How much did you pay for shipping the putting surface? Wittek is charging me $70 with UPS.
plan looks great! I’ll have to add a $200 bribe for the wife as the only modification.
Is thier something you could do to make it chippable wihtout the expense? Oh by the way cool design
Great work Erik. I thought of doing this around Christmas, and have been looking for some tips. After reading your instructions, I ready to go! Thanks, Art
I would like to build an outdoor one, please help me with instructions.
I too call Wittek and not only are they charging $70 +- for shipping, but an extra $120 for shipping to a residence. If anyone knows where I can find another putting surface that will run at a 10 or 11 I would really appreciate it? I’ve already got the framing done, just need the surface.
Hey,
I am building my own putting green and i am confused on the cutting part why only cut 7 instead of all of them
Get two blocks, put a eye bolt in each and run a string from block to block and you have an excellent line for straight putt practice, back and through. The blocks would have to be high enough to clear the surface by about 3-4″ so your ball and putter can travel below the string. You can move the blocks to any angle as long as the string is long enough.
Hey, thanks for the intsructions. All I have to do now is convince my dad to let me buy it.
I am in the middle of doing the same thing right now. Ironically, my plan is almost identical without having seen this. The problem I am having is finding a good carpet to use. I have created my own stimpmeter (easy and cheap to do by the way), and plan on going to Home Depot tonight to see what I can find. I believe most indoor/outdoor carpets will be too fast, but who says it has to be indoor outdoor? I am just going to try find something that will stand up to traffic and that does not have indentations or a lot of variation in the texture. Will report back in a couple days…
Shawn asked about a good putting surface. When I started Putter’s Edge five years ago there wasn’t anything available that would help someone improve their game by providing a realistic surface. Nylon turf was the closest thing to real grass, but the ball wobbled as it came to rest. With the help of a mill in Dalton Ga. we improved the product and process and introduced PAR(Pure Absolute Roll)nylon turf. There is no grain therefore it rolls at the same from every direction. We manufacture the turf in a 12′ width and offer any size at $4.75 plus shipping.
I realize I am submitting an advertisement, but also feel out turf will help everyone inprove their game. Check us out at http://www.puttersedge.com and if you just want a piece of turf you can call me direct at 614 638-6782.
When did you use the water putty? Am I just reading over it?
I may not have, but I had it in case I needed to smooth over any bumps or dips around screws or seams between pieces of wood.
Great Idea, Just add a putting aid like the Putting Pilot or Putting Arc and you are on your way to an awesome putting stroke.
Had a question regarding break. What do you think about first putting down the 5/8 particle board then adding some thin blocks with a bendable 1/4 plywood over that? If not please explain how you created your break.
Brendan, for me, break was a matter of propping up one side of the platform. This allowed me to change the break. Your method, from what I can tell, seems permanent.
I had a question regarding the turf,
I have read through pervious posts and I was wondering your input on Wittek’s quality. I understand this is contradictory, BUT, I am looking for a good quality surface at a moderate price. I don’t want to build the whole green and end up disappointed in the putting surface. On the other hand, I don’t have $500+ to drop in this. I am a student looking for a basement practice green for winter. Whats your take on the greens Erik?
The quality of the turf from Wittek was top-notch, Alex.
How long did it take you build this?
I’ve already bought indoor/outdoor carpet from Lowes and I just read that you said it is too fast. Well I rolled a ball on it and you’re right, it is fast. Is there any way of slowing it down by putting a little water or sand over the carpet? It slows a real green down…
Jarod, it took me a few hours, not counting waiting for the glue, of course.
Sand may slow it down, but you’d have to add a lot, and then you’d have sand everywhere. (Curiously, on synthetic greens, sand actually speeds up the green, I believe.)
what about water?
To improve you putting one could perhaps make the cups smaller than regulation ones. This would encurage you to be more accurate in your putting. When you hit the real greens, the holes will appear to be huge. Or perphaps the cups your are referring to are already smaller?
Erik:
You did a great job on this project. I made something similar several years ago. It was 12′ long and 4′ wide, covered with smooth indoor/outdoor carpeting. I changed the break as you did with shims around the outside base. I incorporated an automatic ball return (I could putt from only one end) by putting a sloping ramp in under the hole and it worked quite well. I used screws to assemble it and it was easy to disassemble to transport when I moved.
I used your plans and made a 14′ X 4′ green. Two cups. One in the center at one end and one to the left on the other. (For break). Not only was this fun to do. But it is a blast to practice on.
Home Depot cut the pieces for me in store to size and loved the thought of what I was putting together. It was plug and play. I also used deck screws instead of nails in case I ever needed to tear it apart to move.
I wanted one longer to be able to practice with a little lag. An added suggestion. Because I had to cut off four feet from one piece of plywood on my project. I had the perfect 4′ piece to lay on top while it dried, to hold it flat in sections instead of books.
For chipping I lay out an extra piece of the fabric I cut off and use a bucket of the foam balls. Not quite as real as the putting. But it keeps me from busting up things in my basement on the wild shots.
Now all I have to do is figure out a way to keep my dog & cat from showing up to steal the ball as it rolls to the cup. 🙂
It worked flawlessly. Thanks a million.
– e
I have to do this! Very cool idea and thanks for taking the time to put this all together!
Regards,
Tyler
Thanks. Will take many of your ideas for my outdoor project.
Nice work.
hey great design i am trying to get the ok to build this stucture about how long did it take to complete? 🙄
Great job! I had the same idea but your plans make it really easy for me to follow through and build this for my son. My question is: what adjustments need to be made to your plans to make a different shape, similar to a golf green instead of just square. Thanks in advance.
Great idea looks like it would work nice, but i want to make a chipping green. i live on farm and i have the room but i dont quite know how to go about building one do you have and ideas.?
I have a quick question. I am building a 4 x 8 green. How much turf should i order. Please give me a quantity.
for those of you looking padding for chip shots, may I recommened thin or moderate regular home carpet padding. I have tried it, and works for moderate soft landing shots. High shots, such as flop shots require more padding.
good luck!
I want to build a outdoor putting green appx. 20 x 20 or 10 x 10. I just need to know what to do. I know this is not going to be prefect. Need to know from a to z. But I just want to try it.
Thanks for the help
😀 Looks great. Thanks for the info… And thanks a ton for posting this.
hey looks great . i changed a couple of things to your plan .
i just bought the cups, and the turf, and i just drilled a few holes in my deck . now when ever i want to put i just lay down the turf and put right on my deck. when i’m not useing i just roll up and cover the holes with a piece of plastic o got at home depot..
I can’t find a cheap putting surface. For some reason my internet says it cant’ find wittek golf. hmmm. I have the frame and surface, but I need turf!
I was wondering how you can build it so you will have breaking putts and if you can make it undgulating (sp?)?
No undulations per se, but I just put a few bricks or something under one side and then I have breaking putts. It’s the first item noted in “Customizations.”
I built one and used a green outdoor carpet that goes in a bass boat. It rolls smooth and is slower than the felt used at putt-putt. I made my platform 6’x8’and the surface cost less than $30. It wears well also. I have been on mine for over a year. I used 2×4’s around the edges instead of pvc. I installed some bolts upside down around the edges and just slipped the boards down through them. I did not use any nuts on the ends of the bolts to hold the rail boards. As a result the surface has the ability to smooth itself as I walk on it. I did not glue down the surface and it has not developed any bumps or wrinkles. Mine stays outside and I use it almost every day. It really works fine. I just block up the sides to create break.
I’ve been looking at doing this, but I’d like to make an outdoor version, and I’d like to put a rubber pad beneath the turf to slow the roll down and handle 10 yd chip shots. My idea is for a 10x15x20 bean shaped green, and is as follows:
(NOTE: This is just an idea, I haven’t started it yet because I’m too busy, and the damn rain in South Texas won’t stop.)
1. Build up an area with horticultural sand, and tamp it down with a hand tamper. Add minor breaks as necessary. (You should also ensure that it’s raised above the rest of the area to ensure that no standing water accumulates. I’d round the edges off so that the edges drain off the green, about 2 degrees should do the trick.)
2. Cover the area with the breathable weed barier that is sold at Home Depot or Lowes.
3. I believe they sell some form of liquid latex that dries in a couple of hours. It’s used to make concrete molds for stamping concrete. I would pour this over the area that is to be used as a putting green. I’m fairly certain that 1/4 inch of thickness with the latex will give a feel similar to that of a real green for shots under 15 yds, but 1/2 inch would probably be best. (I plan to cover the area with 1/4 inch of latex, and test it. If it’s fine, then I’ll stick with that, otherwise, I’d add another layer.)
4. Using some form of carpet/vinyl adhesive, I would then attach the highest quality nylon turf that I could find.
I’d like feedback on this idea, as I haven’t yet attempted it. If you have any ideas or thoughts, please let me know. Thanks!
vincejp2@gmail.com
i would like to turn this into somthing to chip onto outdoors do you have any idea how ❓
Erik,
Great and simple idea. Thanks for taking the time to post this for everyone.
I have an idea about softening and slowing the surface. There is a new type of flooring that’s becoming quite popular in fitness gyms. It’s a glue down rubber flooring. It’s about 3/8″ thick and it’s firm, but it’s forgiving under your feet (low impact). I think this will slow the surface down a little and may even allow your chip shots to hold.
I’m going to make mine either 4’x12′ or 8’x12′. This way, I will have no wasted material (turf is 12′ wide and 3 sheets of plywood will make 8’x12′) and will have room for multiple holes without being cramped. I just thought some of you might beinterested.
Happy golfing!!!!
Great plans but im using 2x4s
my friend made one of these and hitting foam balls on to this works perfect because foam balls spin a lot
Wow I have been looking for blueprints for a long time and here it was right under my nose. 😀
I haven’t built one but just off the top of my head for those looking for a decent chipping surface. I personally would use carpet padding. Just make sure if you are going to put this outside you put a plastic cover layer over it otherwise it would get rather soggy. I’m not sure how thick of padding you should get but personally that is what I would use. Try playing around with the thickness and firmness of the padding and eventually you’ll probably get a fairly receptive surface for chipping.
Another harder but more realistic option would probably to use sand. First I would put edges up, with 2×2’s or 2×4’s, this will give you almost a “sandbox”. Then put down a plastic layer so sand doesn’t go in the cracks, or I guess you could use putty or caulk to seal your cracks. Then put down a half inch or inch of sand. Then another layer of plastic to keep it contained, finally your putting surface. You might just have to run a roller over the surface every once in a while to smooth out your ball marks.
Like I said I have never tried this, these are just my thoughts. So please don’t complain to me if it doesn’t work.
I called Wittek today and they told me that they will only sell the carpet in 50 or 100 foot rolls….where is everyone else buying their turf?
I read on a website today that 1-2 pounds of rounded silica (expensive sand?) per square foot is what you need to hold shots up to 10 yards. Presumably you could use less if you’re not approaching from 30 feet. On an 8×8 chipping green, that’s about 100 pounds of sand.
I am actually going to attempt this. Where do I get the turf?
How much does the turf run?
I’ve finished my green and made the following modifications:
* Used 2X6 around the perimeter and 2’x4′ cross beams. This left a lip to catch the balls and thus requires no border rail. I think it is a much cleaner way to do the platform.
* I used all treated lumber and used OSB for the surface. All boards were then painted with Behr’s new primer/paint product which worked great. The green could be left outdoors with this approach
* I but 36″ grap handles on each end to facilitate carring the platform.
I have left over turf (a 9’X12′ piece). I used a nylon carpet obtained from the carpet mill in GA. This is what they use on sythetic greens installed commercially. I would be willing to sell the extras.
If you would like to see a picture, post a reply with your email and I will send it to you. Same applies to anyone interested in the carpet.
I sell putting turf, Nylon as well as poly. Call me direct or go to my website for putting material.
925.443-PUTT(7888)
our nylon rolls come in 12 and 15 foot widths and start from $2.50 a sq ft.
Dont hesitate, finish your green now!
Any ideas and/or suggestions to make this lighter? Maybe even portable?
😀 😀 this is a very good idea but when i try to go on to Wittek it is not displaying have you got a cheaper ste
Great Idea, I’ve been looking, and this is perfect! My dad’s a builder so nix the 250 bucks! more like 25 for me! Thanks for the help and I will let you know if a sand trap works, we are gunna try.
Question. Has any one built a puuting green that is outside and has weather to contend with? Like snow ? How does the turf stand up ?
I used indoor/outdoor carpet instead of turf. Instead of a cup I found a sleeve of pvc at Home Depot which was 1/8″ thick and exactly 4.25 inches wide (inside diameter) I made the sleeve adjustable up and down so I can could change the surface if I so desire. Under the sleeve I framed in a cavity in which I installed a plastic basket to catch up to 30 balls. I had used 2X6’s to support my platform so there was enough room underneath to accomplish this procedure. The hole in the carpet fits snug around the sleeve. This helps to keep the surface from sliding without using adhesive. The rail boards keep everything from moving once I install them on the edges. I installed some bolts upside down around the edges of the platform and simply slide the railboards over them. The weight of the 2X4 rails keep the surface from moving around as I walk on the carpet. Weather has not been an issue. The surface gets wet and dries on it’s own and walking on it only helps to keep out the bumps or wrinkles. Because I use a sleeve for the cup there is always a nice sharp opening that will not fray or wear. I simply dump the basket of balls on the surface and can putt almost uninterrupted without ever moving from the spot I am standing. If a ball stops in front of the opening I simply reach foward and tap it in the hole. (most of the balls either go in the hole, lip out to either side or continue past the hole to the back rail which is about 4″ beyond the opening. The nice thing about a “bottomless hole” is that you can attempt 10,20,30 putts in a row and concentrate on your posture, grip or stroke without having to go get any of the balls. You end up spending more time making the stroke and less time “fetching” the balls. You can truly “hone” your stroke. I have been putting on mine for a couple of years now and the only maintenance has been to use a leaf blower or broom to clean it off. My platform is 6’X8′ and like others I simply block up the sides to create break. I found a roll of carpet that was 8′ wide and simply had them cut off 6′ and it was perfect with no wasted material. I do a lot of work on my clubs and this is the perfect device to test the results when making adjustments to the length or grip of my putters. I also helped a friend build one and he has really improved his putting. We are both low handicap golfers and have increased our confidence from the practice. All that I am missing now is another surface (slower) that I could switch out when necessary.
Erik,
i found a cheaper place to buy turf, do you think i will be sorry if i make a smaller green such as 6×6 or 4×8?
Eric,
Thanks for the detail and thought you put in to these plans. I have been thinking about a project like this and you have just eliminated all my excuses for not getting started.
The variations could be endless,but your plans have really got my creative juices flowing.
I was looking at the putting carpets at the site you got yours at, and was wondering if you knew if any of the carpets would stimp at an 11 or so?
Nice plans…similar to what I had in mind to build. I do have question, though. When laying out the board on top of the platform, why center it with the middle cross beam? Wouldn’t it be better to just lay the boards the other way, across, not with the beams? Not sure if this would make a difference. Also, I thought about making the holes, then sliding the plastic cups in, forcing the cut carpet down between the platform and the cup. That would certainly keep the carpet in place. ANy thoughts?
That’s a great idea i just can’t find the carpet you used cause the ones at Wittek was like 210 for a 8 by 8 area. Thanks
Anyone try this from home depot?
Star Pro ProLawn Synthetic Lawn Putting Turf for Indoor and Outdoor Golf Practice Greens-Model RGT1 .
I want to use this to build a green at home, but just as everyone indicates, the wittek place doesnt seem to have it. Also, this home depot version costs $63.75 for a 12 inch by 180 inch roll. This means a two foot by 90 inch putting surface unless you buy two rolls.
Any thoughts or experience with this product is appreciated.
Luc and C-monster, I have a 9X12 piece left over from my green that I am willing to sell. I would let it go for $150. The roll was ordered directly from a mill in Georgia and I can send you a sample before you purchase if you like. Post back your email if your interested.
Kevin
Hi everyone,
I found a great place to buy the putting surface/green. I live in the Northeast and there are a lot of Building 19 1/2’s around this area. They have two types of putting turf; one is indoor/outdoor with no padding underneath, the second is the same high quality turf with foam padding underneath.
Don’t know why, but they are both the same price, which is only $1.11/sq foot. The indoor/outdoor with no padding comes in 12 ft wide rolls and the one with padding comes in 6 ft wide rolls. Today, I bought two 6′ X 12′ strips of the padded version (very, very nice quality) to make a 12′ X 12′ putting green.
The total cost was around $157!!!
Hope some of you have these stores in your area and can take advantage of the great price!
Nancy
Anyone tried using artificial turf on real ground?
I was at Home Depot the other day and found a roll of turf 12×12 for only $60. I live in Texas and the weather isn’t too bad. i have a section at the back of my yard that will accomodate a 6×24 green but am wondering to get the turf to conform to a surface with some breaks without creating wrinkles and creases.
yeah i know how to build one contact me @ l.boshart@gmail.com if you want to know how its free info!
very good idea, will be building soon but im attempting to put this thing outside, i was wondering if putting some wood fiber sheeting on top of the ply wood, its like 3/8 inch thick and is kind of like a 4′ by 8′ piece of foam/cardboard, we put it on some of the houses we build, as the cost ratio of that versus plywood is about 4 dollars difference, as well as a piece of rubber on top of that, then the turf? think that would be good for chipping and pitching from a distance?
thanks for the insight, it was very helpful. We have completed everything except for the turf. The size of our green is 12 x 7, with the holes located near where you put yours. We opted to get a carpet rather than a turf, and having them install it is running around $300 total.(installation and carpet)
They are coming to install the carpet in 2 days, and am looking forward to using the putting green.
thanks again
Bart
This is great. Where are folks getting the turf or carpet. I am leary of carpet since it tends to be too fast 16 on the stint meter, but do not want to make this project too expensive. Any thoughts are appreciated.
If you live near a Building 19 1/2 see my post above –
We have an outdoor putting green that i had professionally installed about 8 years ago and have found now the turf tough to get to a consistent roll and speed. We decided on carpet after a local golf shop had carpet on their indoor putting green.
My son spent a long time rolling balls on the different carpets until he found one that looked about 11-12 on the stint meter.
It gets installed today and i will let you know how it works out.
Bart
Carpet is installed and it is great!!!!! the carpet we chose is ALA ALA.town.center.36, color Hunter Forest.
thanks again for this helpful site
Home depot in our area has several varieties of turf ranging from 13 sq yd. to 21 sq/yd. so for my 8×8 will be around 150
Thanks
Kevin,
Do you still have your extra piece for sale?
Nancy – do you mind saying which B19 you found it in?
Carl, yes I do. Let me know if you want me to send you a sample.
Kevin
RS,
I got it at the building 19 in Manchester, NH – there were huge rolls of both the padded and unpadded versions of the putting green surfaces (as of 9/18/08).
I found the receipt, but there is no SKU or product code on it – just says 6 X 24 (ft) of “13 Broadloom”. Hope you can find it – it is a really nice commercial grade for cheap!
Nancy
Think I have had the page bookmarked close to ever since it was posted. Finally getting around to building one. 12 x 8, made from 2×6’s, will get the 4 – 4″ cups, right now struggling with the price of what I perceive is high quality turf. Just don’t want it to fast. Right now going with a Grass Tex product that I can purchase at Menards here in Iowa. Foam backed or not? About a $1.50 a square foot more for the foam back.
I have the frame almost build. It’s have to stay with the house if we ever move 🙁 .
Thanks for the initail instructions. I built with many modifications form yours. Mine is 8 x 7 and cost me about $230. I did not build a frame but instead I cut out the green pattern I wanted and joined together two pieces of plywood. I used small cups and put legs under the plywood so it sits above the ground 3″. This is for in my basement. It is winter here in Toronto now, but I will try an outdoor green in the spring.
I could attach pics but there is no way to do it 😥
Dave, where did you got the carpet? I’m also in the GTA (Georgetown)
Thanks for the design, Erick.
I made my putting green 6′ x 8′ instead. I used 2 x4s instead of the 2 x 8s. I bought 3 4″ tall putting cups and 3 flag sticks with the base from Wittek. The bill from Wittek came to $56 which I thought was a good price. The cups were just tall enough with about a 3/8″ clearance on those 2 x 4s. The 2 x 4s are not really 4″ but 3.5″ (everyone knows that) but since I was putting the 5/8″ particle board on top of the 2 x 4 it would make it over 4″. I bought the putting carpet from Menards here in Minnesota at $0.55 a sq.ft. The sku # if anyone is interested is 767-3446. The cost of the building materials costs me $145. I already have the nails and I borrowed the drill to make the holes from work. I did not bother pasting or gluing the carpet.
This is very helpful. But there is only one mistake with what you have done. The point here is to practice putting, and the number one error in putting is distance control. By having the holes so close to the edge there is no opportunity to putt “too far past” nor the opportunity to make the comebacker. I highly recommend to anyone building their own putting green, indoor or out, make sure there is plenty of room beyond the hole and force yourself to work on distance control. Or comebackers. But thanks for the great detail in all you’ve done. It’s going to be a great help to me.
Finally found the time to put one together. Good plans! I did make a number of modifications. Made mine 10×8. Used 2x6s as outer frame and 2x4s for the flooring, that way I had a built in guard for balls. Might need to upgrade my carpet at some point, running a little fast on the stimp meter.
Ive read all the posts and am gonna get started. Like everyone else I am concerned with the turf. Can someone who is truely happy tell me where I can get high quality turf for this thing. I will check back in a few
I’ve been doing some research to find putting surface in the Toronto area. Here’s one possiblity I’ve found so far… http://www.pro-greens.com/prices.html. They also sell putting cups and flags.
ive been considering making one as well. as far as break goes, what if you elevated part of the green, making it like an inch or so higher and giving it a 2 tiered type set up, but not quite. if you did it in the middle and put the holes near the height change, putting from the other level would give a good break. just an idea, think it would work?
Hey man this is an awesome idea. I just started doing it today and ive got it all togetther except the carpet. Although when I walk on the parts of the would where I dont have a brace it feels like it is about to fall through. Did you buy a special kind of partical board or something. Please email me or something to help me out on this. Thanks
I am finishing off mine today (though outside not inside). I used OSB (oriented strand board) in 8×4 sheets but i made sure i had 2x4s going across (4 ft widths not 8) every 16″ and so far it seems very sturdy. Hope this helps!
is there a way you could put it outside and make it even to the ground to chip on?
The area I’m working in is not conducive to what I am going to suggest, due to tree stumps and roots, but I have to believe if you dug down 3 1/2 inches and did what I did you could have the same green but flush to the rest of the yard for chipping to. Mine is built on 2×4 studs in a frame with the studs 16″ apart (like a framed wall or floating floor). Or, but harder to predict, put down a bed of gravel and sand, pound it flat, and then lay your artificial turf down on that.
it worked really good i love it 😈 😯 😕 😛 😳 😆
Just finished mine. i did it a little different but same idea – it works really well. thanks alot for the idea and the instructions
I am thinking about building this myself but i cant find the three cups and flags for a cheap price they are all like 20 dollars each. Does anyone know where i could find some for a cheaper price
Go to wittekgolf.com and give them a call. I just got off the phone placing my order. the four inch deep cups were $4.something and the six inch deep cups were $6.25 or something within a quarter of that.
p.s. I talked to the rep for a while, who happened to sell the carpeting to Dicks sporting goods and he said that the “one-putt” putting surface was not as good for what we are trying to do here as the”putt softly”. the one putt is something you would see at a mini golf place and the putt softly rolls at about a ten. Another perk, the putt softly is cheaper (because the one-putt is designed for high traffic)
I just ordered an 8′ x 12′ roll of putt softly and five six inch deep cups for 181.79 plus shipping, which has to be done freight from Georgia. That may run another $75 to get to CA.
So this will cost me $250 in just the green and the cups, but I am taking on more area.
Thanks for the walkthrough!
A wise man once said “masturbation does not make you better at sex. You just get better at masturbation.” What you are doing here is exercising your putting muscles only.
And that can be done just as simply by laying some low nap carpet or synthetic grass on the floor of your garage or patio. For cups you just mark lay a 4″ felt circle/s on top and move them around as needed. When done you roll the carpet up and throw off to the side. Less materials used ( better for planet ) less money/ time/ gas spent ( good for you & planet ). Better WAF ( Wife Acceptance Factor ). Then when you find that you don’t really use it that much you don’t have to disassemble it. When you move it’s easy to transport. And when you finally realize what the real secret to being a consistent, good putter really is you can easily throw it away.
BUT- if you MUST have one of these DIY el cheapo putting surfaces then do what I did for a buddy of mine. Buy two sheets of 4x8ft 3/4″ plywood ( shop grade ). Hinge them together using 1/2″ x 8′ piano hinge down long edges ( route out space for hinge so plywood butts together when opened like a book ). IMPORTANT: Synthetic grass is going on the outside like a book cover when closed so figure out how I set the hinge up to work so that the two grass sections close together tight like a Ping Pong table. Next cut holes where you want them. Next open it flat onto the floor and glue on grass. Trim edges, strike a line down center abutting ( hinge is underneath ) and run razor blade down this line after glue has dried. Fold it up and lay against garage wall to store. Unfold and lay flat when you want to practice. Center cut should be almost imperceptable to the eye if you did it right. Balls fall into 7/8″ deep holes. Then in 9 years when there’s no more water for golf courses you can play on your pretend putting green.
This is too funny! I was researching how to build a putting green in your backyard and I found your site. Very clever idea! I don’t have any space inside my house to do this but I like your design and your suggestions on customization keep up the great ideas!
Were you spanning open area or something. If the surface is indoors on a floor I wouldn’t worry about bowing. It would be supported. I think I could live with homemade cups that were shallow enough to use 2×4. It would be cheaper and much easier to handle.
I have access to everything and I even have a piece of artificial turf from a college field hockey field. My problem is that the turf is only a little over 4 feet wide and I want my green to be 8 feet wide. How can I seam it together to achieve a smooth surface for putting without a definite ridge or valley to distract the path of the ball?
how can me and my father were going to put one together and yours looks really nice where did you get the flags
Great idea, thanks for the instructions, I couldn’t be happier. However, one warning to all who consider this idea: Get your putting surface figured out before you start the project. The cheapest I found was $2.99 per square foot. Wittek has a price that’s lower, but after their minimum size, “Cut charge” for cutting the roll, and shipping, it’s about $275, so it’s a wash. The $120 they found for the green seems to be impossible to find now.
Ive been casually reading about making a putting green, since i’m on my golf team. Ive thought of a way to create a break:
Before you put the flat planking on top, put some small flat square of wood at spots were you want a break, but not to tall, i’d say maybe a maximum of a 1/2 inch tall. Put these on top of the wooden braces on the inside. When you go to put over the smooth wood, if it is flexible enough, you should be able to bend it over and thus create some nice breaks.
i was thinking about doing this myself, but just bigger in my backyard. Do you think i could dig a hole in the ground and place it in there so it would be level so i could do chip shots and pitch?
Used workfloor cushions (1/2 inch thick, 4 2×2 interlocking pieces from harborfreight about $8, used 3 packages to make 4×12 surface, save the extra borders to insert underneath for breaks) and 6×8 carpet from Menards on sale at $9.99, much slower than indoor-outdoor carpet, very much like real green. Cut in half to make two 4×6 pieces. Double-sided carpet tape very easy to seam the two pieces almost undetectable. Cut holes. Can chip to from mat. Very portable. Only drawback is 1/2 inch ball drop, but could achieve more if put on a platform.
How portable is this green? I am thinking about making one similar to yours that has hinges on the bottom so I can fold it in half. Do you have trouble moving it?
I am actually buying the “Putt Softly” carpet from Wittek and installing it in all 900 square feet of my upstairs, including 6 holes drilled into the subfloor!
Our kids live upstairs and my son is an avid golfer. Plus, this carpet is great for train sets, legos, lincoln logs – whatever, and is almost stain proof.
Going to work out great, and hopefully it will sharpen up my putting skills!
Husker, I have been looking for the “Putt Softly” carpet on the Wittek website and I can’t seem to find it? Is it along with the “Mini Putt” carpet, or in another category?
chris
thanks for your help. I am getting ready to build a 4×12, and two 4×6 putting greens. I was told the indoor/outdoor tape would work well but I like your idea of puting glue around cup holes. Do you have to worry about the cups pushing through the plywood tops or is there too little room for that. We are using 2×4’s with 3/4 inch plywood top.We are puting these along a wall with a 2×6 on one side so we can stand on end along a wall when not using,.
I got the putt softy from Wittek and the only thing is I wish it was a tad bit faster. You can find it in the carpets section of the Wittek catalog.
We have extremely fast bent grass greens where I live, and had I known the Putt Softly was going to roll considerably slower, I would have just gone to Lowes and gotten some stuff that seems to be much faster.
But…it is still quite fun and realistic and doesn’t very TOO much from what we are accustomed to here.
Pardon my ignorance, but what makes something like this better then something like the Grassroots Par Three Putting Green (3×9 Feet) mat I see on Amazon for $40?
I have been thinking about building this mainly because I have all the scrap wood needed and I like to build things but as I think more about it, I can’t figure out what the advantage is. It seems like it would just be big and bulky and after buying a nice surface from Wittek probably 2-3x more money then the Amazon one I referenced.
I love the idea. I would just like to know if there is some sort of rubber padding that I could put under the turf to handle short (no more than 5 yd) chip shots.
How can I include a picture of my platform?
Click on my name to see photos of my platform putting green.
What do you think the minimum thickness is you can use for the particle board that sits on the top?
Matt, 1/2″ is probably fine, but it depends on how much space you have between supports, too, to minimize any bowing/drooping.
See also this thread: https://thesandtrap.com/forums/topic/88036-help-me-design-a-basement-putting-green/ .
Also would MDF do the same job as particle board?
You all have been so much help to me over the past couple of years I felt the need to share out.
Have built both an outdoor putting green 12×12 and indoor 6×16 — both built cheaply and have turned out better than expected. Please note — I am only mildly handy.
Indoor materials – Harbor Freight anti-fatigue mats, for underlayment. Carpet is Foss fairway indoor/outdoor carpeting – 2 6×8 carpets for $20 each. 1/4 thick scraps (even cardboard) underneath create unlimited and movable breaks and undulations. For cups – simply cut one inch (more challenging) pvc pipe into 1/4 in thick “cups” that sit on top and can be moved anywhere. The perfect put will actually stop inside the pvc piece. Takes 2 min to roll it up and store in a closet when company comes over.
Outdoor green was a bit more work. leveled ground. Moved a great deal of dirt. Tamped down by hand. In place of road base I used 6 (4×6, 3/4 in thick) rubber stable mats — aka cow mats. Purchased at Farm and Fleet store for $40 each. Each spring I pull up and re-level. Can accept chips from at least 20 yards away (maybe farther, but small yard). Mats are pretty heavy, but believe thinner and lighter ones also available. Outdoor putting carpet was purchased from Allturfmats.com — 12×12 piece for about $220. Terrific surface that has held up to Chicago winters for two years now. Surrounded it with paving brick border and told my wife it was a second patio. Of course she didn’t believe me, but we do sit out on it on summer nights to watch movies projected onto a net I built next to the putting green).
The net is an 8×8 surface that I can hit real balls into. Built with the following materials. 2 6 ft steel u-fence posts (pound into ground with a sledge hammer or fence post driver. Slide over some pvc pipe to form an upside down U. 3 10 ft (2in) pipe, cut down to 8 ft. (about $5 each), held together with 2 L pieces (at $2 each). No glue. They’ll stay together if you cut it to size correctly. The net is a $25 harbor freight mesh tarp (8×10). Attached with zip ties. Leave it out until the first snow fall and put it up in April.
If anyone is looking for the indoor putting material the Pros have been using for their indoor putting green carpeting here is the EBAY link. The product is fantastic and I constructed my own indoor putting green with it. http://www.ebay.com/itm/54-034-x-120-034-Camry-Putting-Green-Carpet-rec-by-PGA-Tour-Pros-Toyota-Birdie-Ball-/263234628203?ssPageName=ADME:L:LCA:US:1123
Such a great article you had shared admin.it’s really very expensive to buy an indoor putting green from the market or online.thanks a lot for sharing this hack with us.i had no idea about it before. Your tips will help me to make that cheaply. Keep posting this type of helpful articles.. 🙂